أعاني أحيانًا مع رموشي، وأشعر بالإحباط عندما لا تبدو رموشي ممتلئة أو مرفوعة. وأريد طريقة سهلة للحصول على تلك اللمسة النهائية التي يمنحها صالون التجميل في المنزل.
يمكنك عمل رموشك خطوة بخطوة من خلال اتباع روتين واضح، بدءًا من تحضير منطقة العينين إلى وضع الوصلات أو الرموش الاصطناعية بعناية لتتناسب مع الإطلالة التي ترغبين فيها.
أجد أن اتباع نهج منظم يساعدني على الشعور بالثقة عند العمل على الرموش سواء لنفسي أو لعميل. لنستكشف هذه العملية بشكل أعمق.
كثيراً ما أتساءل عن الخطوة الدقيقة التي تحدد بالضبط ما هي الخطوة التي تحدد مسار تطبيق الرموش الناجح. يبدو أن تفصيلة صغيرة يمكن أن تغير النتيجة النهائية.
تتمثل الخطوة الأولى المهمة في تطبيق إطالة الرموش في التحضير المناسب، والذي يتضمن تنظيف منطقة العين والتأكد من خلو الرموش الطبيعية من الزيوت والشوائب.

يعد التحضير جزءاً أساسياً من أي عملية إطالة للرموش. أعتقد أنه إذا لم يتم تنظيف الرموش جيداً، فقد لا تلتصق المادة اللاصقة بشكل صحيح. وقد يتسبب ذلك في سقوط الوصلات في وقت مبكر أو عدم التصاقها على الإطلاق. في البداية، أقوم بإزالة كل آثار المكياج والزيوت وأي منتج متبقي من الرموش. أستخدم منظفًا لطيفًا خاليًا من الزيوت مصممًا لإزالة مكياج العيون. يساعدني ذلك على ضمان عدم تهيج العينين أو إضعاف الرموش الطبيعية. إن خط الرموش النظيف هو المفتاح لربط الرموش بقوة والاحتفاظ بالوصلات لفترة أطول.
أستخدم ضمادات قطنية ناعمة أو أدوات تنظيف خالية من الوبر عند التنظيف. أريد تجنب ترك ألياف صغيرة قد تلتصق بالرموش أو خط الرموش. بعد التنظيف، أترك الرموش تجف تمامًا. بعض الناس يستخدمون مروحة صغيرة، بينما يتركها البعض الآخر لتجف في الهواء. في كلتا الحالتين، الجفاف أمر حيوي للخطوة التالية.
يتضمن التحضير أيضًا تقييم الرموش الطبيعية. أتحقق من سماكتها وطولها وحالتها العامة. أبحث عن علامات التكسر أو الفجوات. وهذا يساعدني في تحديد طول أو سماكة التمديدات الأفضل. إذا كانت الرموش الطبيعية ضعيفة، قد أستخدم وصلات أخف حتى لا تثقل الرموش. أما إذا كانت الرموش الطبيعية قوية، فقد أختار مجموعة أكثر كثافة. أولويتي هي مطابقة قوة الرموش الطبيعية للزبونة والمظهر المرغوب فيه.
بعض فني رموش1ق أيضًا استخدام البرايمر لتحسين الالتصاق. يساعد هذا البرايمر على موازنة درجة حموضة الرموش. ويزيل أي آثار زيتية أخيرة قد تؤثر على المادة اللاصقة. أضع البرايمر بعناية مع تجنب ملامسته المباشرة للعينين. أريد فقط عمود الرموش أن يستقبله.
ومن خلال إكمال هذا التحضير بعناية، أمهد الطريق لتطبيق التمديد بسلاسة. فأنا أقلل من فرصة سوء الالتصاق أو ردود الفعل التحسسية أو غيرها من المشاكل التي قد تنشأ لاحقاً. يؤدي خط الرموش المُعد جيدًا إلى تجربة أفضل بشكل عام. أرى أن هذه الخطوة، على الرغم من بساطتها، هي الأساس لنجاح تطبيق إطالة الرموش.
أرى أحيانًا رموشًا مسطحة أو متدلية. أريدها أن تبدو مرفوعة وتفتح عينيّ دون الحاجة إلى وصلات دائماً.
يمكنكِ تجعيد رموشكِ ورفعها باستخدام أداة تجعيد الرموش وإضافة علاج رفع الرموش2 التي تثبت الضفيرة في مكانها لعدة أسابيع.
تجعيد الرموش ورفعها هي عملية يمكن القيام بها في المنزل أو في صالون التجميل. في المنزل، غالبًا ما أستخدم أداة تجعيد الرموش اليدوية. أضعه عند قاعدة رموشي وأضغط عليه برفق لبضع ثوانٍ، ثم أتحرك قليلاً إلى الأعلى وأضغط مرة أخرى. يخلق هذا تجعيدًا طبيعيًا متدرجًا بدلاً من الانحناء القاسي. لجعل التجعيد يدوم لفترة أطول، أقوم أحيانًا بتدفئة أداة تجعيد الرموش باستخدام مجفف الشعر منخفض الحرارة لبضع ثوانٍ قبل التجعيد. يجب أن أكون حريصة على عدم المبالغة في تسخينه، وإلا فإنني أخاطر بحرق بشرتي أو رموشي.
يذهب علاج رفع الرموش إلى أبعد من ذلك. فعملية رفع الرموش هي في الأساس تمويج لرموشك الطبيعية. تستخدم خبيرة الرموش محلولاً خاصاً لإعادة تشكيل الرموش حول قضيب من السيليكون، مما يخلق تجعيداً أو رفعاً طويل الأمد. يمكن أن تستمر هذه العملية لمدة تصل إلى 6-8 أسابيع. يحب العديد من العملاء هذا العلاج لأنه يعطي رفعاً شبه دائم، مما يقلل من الروتين اليومي لتجعيد الرموش. وأقدّر أنها تساعد أيضاً على وضع الماسكارا بسلاسة أكبر، مما يعطي تأثيراً أكثر دراماتيكية.
عند تحديد الطريقة التي يجب استخدامها، أنظر إلى الوقت والميزانية والتفضيل الشخصي. إن استخدام أداة تجعيد الرموش اليدوية سريعة وبسيطة، ولكن عادةً لا يدوم التجعيد أكثر من يوم واحد. قد يكون رفع الرموش أكثر تكلفة، ويتطلب موعدًا، لكن النتائج تدوم لفترة أطول. كذلك، قد لا يكون رفع الرموش هو الخيار الأفضل إذا كانت رموشكِ ضعيفة جداً أو متناثرة، لأن العملية الكيميائية يمكن أن تسبب ضغطاً على الرموش. من المفيد دائماً استشارة أخصائي إذا كنتِ غير متأكدة.
وللحفاظ على أفضل النتائج، أتجنب فرك عيني أو النوم ووجهك للأسفل. كما يمكن أن يساعد استخدام مزيلات المكياج الخالية من الزيوت والمنظفات اللطيفة في الحفاظ على الرموش المصقولة أو المجعدة. إذا اخترت رفع الرموش، فعادةً ما أتجنب استخدام الماء على الرموش خلال الـ 24 ساعة الأولى للسماح للمحلول بالثبات الكامل. من خلال اتباع هذه الخطوات، تبقى رموشي مرفوعة ومجعودة وجاهزة للمسكرة أو خيارات المكياج الأخرى.
كثيرًا ما أسمع الناس يسألونني عن الرموش الاصطناعية الأفضل لاستخدامها في المناسبات الخاصة أو في الاستخدام اليومي. هناك العديد من العلامات التجارية والأنماط التي قد يكون من الصعب اتخاذ قرار بشأنها.
أفضل الرموش الاصطناعية خفيفة الوزن ومريحة وتناسب شكل عينيك. المنك, فرو المنك الصناعي3، والرموش الحريرية شائعة لأنها توفر مظهراً طبيعياً بأقل قدر من الإزعاج.

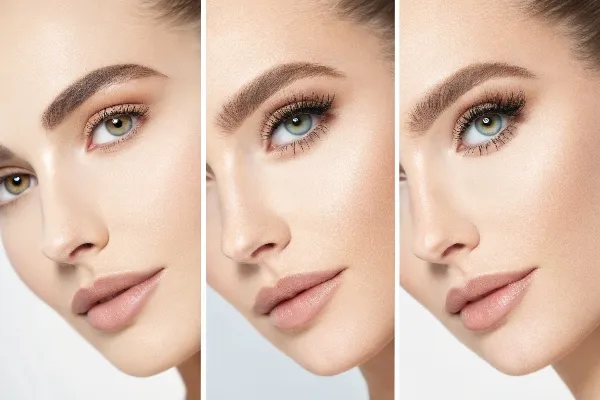
اختيار أفضل الرموش الاصطناعية يبدأ بمعرفة تفضيلاتك وشكل عينيك. لا يوجد حل واحد يناسب الجميع. فبعض الناس يحبون الرموش الدراماتيكية التي تضيف كثافة وطولاً كبيرين، بينما يفضل البعض الآخر التحسينات الرقيقة التي تمتزج بسلاسة مع خط الرموش الطبيعي. أحب أن آخذ في الاعتبار شكل العين وحجم الجفن وعدد المرات التي أخطط لوضع الرموش فيها.
غالبًا ما يتم الإشادة برموش المنك لخفة وزنها وملمسها الطبيعي، على الرغم من أنها قد تأتي مع أسعار أعلى ومخاوف أخلاقية. يوفر المنك الصناعي بديلًا خاليًا من القسوة يحاكي نعومة وملمس الريش الذي يتميز به المنك الحقيقي. تكون الرموش الحريرية أكثر سمكاً قليلاً عند القاعدة ولكنها لا تزال تنحسر بشكل رائع نحو الأطراف. بالنسبة لي، يجب أن يكون الزوج المثالي ناعمًا ومرنًا وسهل التطبيق.
أتحقق أيضًا من شريط الرموش. عادة ما يكون الشريط الرفيع والمرن أكثر راحة وأسهل في الإخفاء باستخدام القليل من الكحل. قد يوفر الشريط السميك إحساسًا أكثر ثباتًا ولكن يمكن أن يكون أكثر وضوحًا. أنتبه إلى طول الرموش. إذا كانت طويلة جدًا بالنسبة لشكل عيني، أقوم بقصها من الحافة الخارجية للحفاظ على الشكل. إذا كانت قصيرة جدًا، فقد لا تعطي التأثير الذي أريده.
بالنسبة للارتداء اليومي، أختار أحياناً تصميماً أكثر طبيعية بأطوال متنوعة تحاكي نمو الرموش الحقيقية. أما بالنسبة للمناسبات، فقد أختار تصميماً أكثر انتفاخاً وأكثر دراماتيكية. إذا كنت جديدة في وضع الرموش الاصطناعية، أبحث عن العلامات التجارية التي تقدم رموشًا جزئية أو نصف رموش. يمكن أن تكون هذه الرموش أسهل في التطبيق، كما أنها تمتزج جيدًا مع رموشي الطبيعية.
إزالة الرموش الاصطناعية بشكل صحيح هي نقطة أساسية أخرى. فأنا أستخدم دائمًا مزيل مكياج لطيف وخالٍ من الزيوت لإزالة غراء الرموش قبل إزالتها. أتجنب شدها أو نزعها لأن ذلك قد يضر برموشي الطبيعية. يمكن إعادة استخدام بعض الرموش الراقية عدة مرات إذا اعتنيت بها وخزنتها بشكل صحيح.
في النهاية، أفضل الرموش الاصطناعية هي تلك التي توفر لي الراحة والمتانة والمظهر الذي أريده. تتفوق العلامات التجارية المختلفة في مجالات مختلفة، لذلك أقوم أحيانًا بالتجربة حتى أجد المفضل لدي.
أنا معجبة بالطريقة التي يتمكن بها تقنيو الرموش من تطبيق وصلات الرموش الفردية بدقة متناهية. قد تبدو هذه العملية مخيفة، لكنها مذهلة بمجرد أن تقومي بتحليلها.
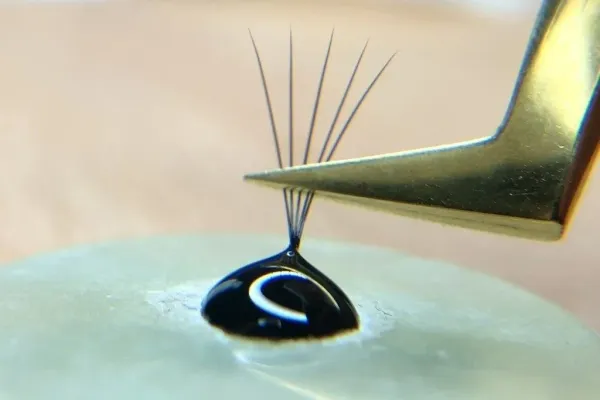
يقوم فنيو الرموش بوضع الرموش عن طريق عزل كل رمش طبيعي، ثم استخدام مادة لاصقة احترافية4 لإرفاق ملحق مروحة واحدة أو ملحق مروحة كبيرة الحجم للحصول على مظهر سلس ومخصص.
يتبع تقنيو الرموش المحترفون إجراءات دقيقة عند وضع وصلات الرموش لضمان السلامة والراحة وطول العمر. أولاً، يقومون بإجراء استشارة لمعرفة تفضيلاتك وتقييم رموشك الطبيعية. ويقومون بالتحقق من وجود أي علامات تهيج أو حالات قد تمنع التطبيق الناجح. تساعدهم هذه الخطوة على تحديد طول وسماكة التمديدات المناسبة. كما تساعدهم أيضاً على تأكيد المظهر المرغوب فيه للعميل، سواءً كان كلاسيكياً أو كثيفاً أو هجيناً.
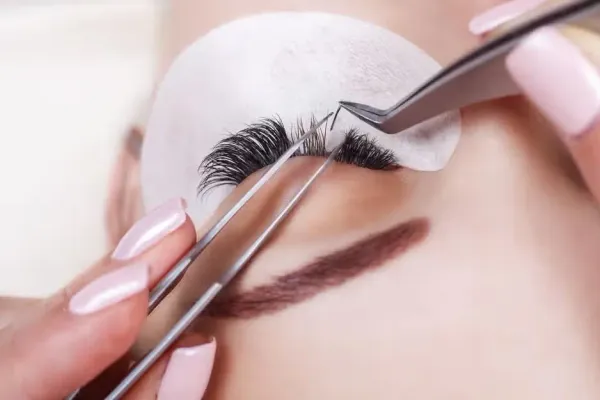
وبمجرد الانتهاء من وضع اللمسات الأخيرة على التسريحة، يقومون بإعداد منطقة العين. ويشمل ذلك تنظيف الرموش لإزالة الزيوت أو المكياج أو البقايا. يستخدم بعض الفنيين ضمادات تحت العينين أو شريط لاصق لطيف لتثبيت الرموش السفلية ومنعها من إعاقة الرموش. بعد ذلك، يبدأون عملية العزل، حيث يفصلون كل رمش طبيعي باستخدام ملاقط متخصصة. العزل أمر حيوي لأنه يمنع الرموش المتعددة من الالتصاق ببعضها البعض، مما قد يؤدي إلى عدم الراحة أو النمو غير السليم.
بعد ذلك، يقوم التقني بغمس الوصلة في مادة لاصقة احترافية. يثبتها على الرموش الطبيعية، ويضعها بالقرب من القاعدة دون لمس الجفن أو الجلد. عادةً ما تكون المسافة من خط الرموش حوالي 1-2 ملليمتر. ويضمن ذلك ملاءمة مريحة ويقلل من خطر الحساسية. تتضمن الرموش الكثيفة إنشاء مراوح صغيرة من وصلات رقيقة متعددة قبل ربطها برموش طبيعية واحدة. تتطلب هذه التقنية مهارة لضمان بقاء المراوح رقيقة ومتناسقة.
أثناء العملية، عادةً ما يُبقي العميل عينيه مغلقة لتجنب التهيج أو التلامس العرضي مع الأبخرة اللاصقة. يعمل التقني بشكل منهجي، حيث ينتقل من قسم من خط الرموش إلى قسم آخر، حتى يتم وضع جميع الرموش المرغوبة. يمكن أن يستغرق الموعد من ساعة إلى ساعتين للمجموعة الكلاسيكية، أو أطول من ذلك لمجموعات الحجم أو مجموعات الحجم الكبير.
بعد وضع الوصلات، عادةً ما يقوم الفني بتجفيف المادة اللاصقة بمروحة صغيرة أو رذاذ من ماء النانو، مما يساعد على معالجة المادة اللاصقة وتقليل الأبخرة. وأخيراً، يمرون على الرموش للتحقق من عدم وجود أي خيوط ملتصقة ببعضها البعض. كما يتأكدون أيضاً من أن كل شيء مريح للعميل. وتساعد تعليمات العناية اللاحقة المناسبة، مثل تجنب الماء أو البخار خلال ال 24 ساعة الأولى، على ضمان بقاء الوصلات في مكانها لفترة أطول. ويؤدي هذا النهج الاحترافي إلى نتيجة جميلة تدوم طويلاً يمكن للعميلات الاستمتاع بها دون عناء الرموش الشريطية أو الماسكارا الثقيلة.
يمكن لروتين الرموش خطوة بخطوة أن يحول مظهركِ من خلال التحضير الصحيح وتقنيات التجعيد والتطبيق الدقيق. وسواء كنتِ تفضلين وصلات الرموش الاصطناعية أو الرموش الاصطناعية، فإن المفتاح هو اتباع كل خطوة باستمرار واختيار التسريحات التي تتناسب مع شكل عينيك وذوقك الشخصي.
اكتشف المهارات والتقنيات الأساسية التي تجعل فني الرموش ناجحاً في مهنته. ↩
استكشفي هذا الرابط لفهم فوائد علاجات رفع الرموش وعملية رفع الرموش للحصول على تجعيدات طويلة الأمد. ↩
تعرفي على رموش المنك الصناعي، وهو بديل خالٍ من القسوة يحاكي نعومة المنك الحقيقي، وهو مثالي للجمال الأخلاقي. ↩
استكشفي هذا الرابط لفهم أهمية المادة اللاصقة الاحترافية في وضع الرموش وتأثيرها على طول العمر والأمان. ↩